Friday, 25 December 2015

Invite All Friends To Facebook Page By Single Click – 2015-2016

Facebook is social media network where we create profile, Pages, groups and events. To interact with people. Normally we use Profiles but for special purpose or for a business we need to create page, group and event. It is not an easy task to grow page, group or any event. The difficult task we face is sending invitation to others to join our page, event or group. Suppose we have 5000 friend so it we task 1 sec for invite every person then we need approx 1,2 hours to complete this task. So don’t worry and also don’t waste your precious time. Here i going to explain you best way to invites all friend to like your page or invite them to join you even just by single click. Its really easy and best way just by installing chrome extension and start inviting your friends. This is only for working pages and event and you invite them but if you want to invite them into group then this trick is not for you. I already post about

Method 1st:- Invite All Facebook Friend By (Chrome Extension)

  • First of you need to install this Google chrome extension.
  • This extension will provide the feature to invite friend by one click.
  • After the installation of this chrome extension small icon will start appearing on the top right side of the browser.
  • Button will only appear when you open Facebook otherwise it will disappear.
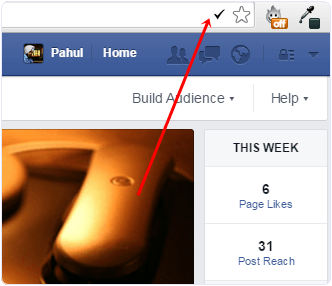
  • Now login your account whom friends you want to invite to like page.
  • After that open your Facebook page and then click on the Invite all friend button.
  • New pop up window will appear with name of all friends.
  • Then click on the icon of the extension which had installed.
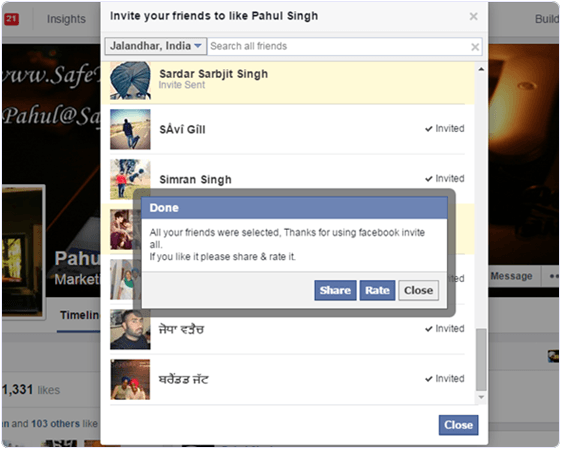
  • After that just wait for few second your all friends invite automatically.

Method 2nd:- Invite Friends By Using Script

  • First of all open your Facebook page and then click on Invite all friends option and pop window will appear.
  • After that press F12 button on keyboard. Now console window box will appear.
  • Copy below code and paste them in console box.

var inputs = document.getElementsByClassName(‘uiButton _1sm’); for(var i=0; i<inputs.length;i++) { inputs[i].click(); }
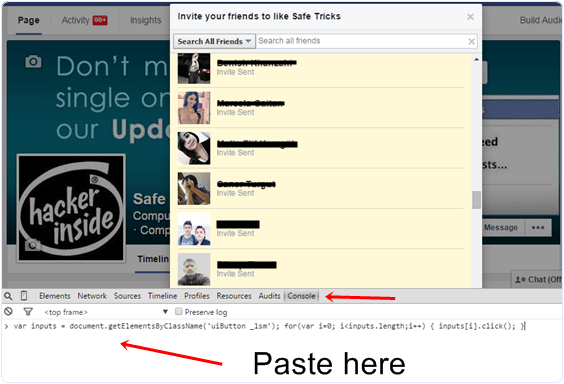
  • After pasting code in console press button and invitation to like page will send successfully.

I hope you like this trick to invite all friends just by single to like your page or join event. Don’t forget to share with others.

FREE DOWNLOAD GOMEDIA THEME PREMIUM


GoMedia is a fresh magazine theme with a modern, elegant design and fully responsive. It’s perfect for online magazines websites, news websites, personal blogs or community blogs.

General Theme Features

WordPress 4.3.1 Compatible

WordPress 4.3.1 Compatible

We update our themes regularly to keep them bug free, and to take advantage of the latest WordPress version.
Advanced Control Panel

Advanced Control Panel

You can take full control of your theme with our powerful yet easy-to-use theme options panel from setting to styling.
Search Engine Optimized

Search Engine Optimized

Smart design and XHTML valid code ensures maximum search engine visibility for your WordPress site.
Custom Widgets

Custom Widgets

Our themes come packaged with multiple custom widgets including Twitter, Flickr, and additional custom widgets to enhance your site.
AD Management

AD Management

You can place various size of banner images in your sidebar and banners to other built-in ad positions with ease.
Lifetime Support

Lifetime Support

Whether you are a single theme user or club member, you will get lifetime support from us. And yes, it's all FREE.
Cross-browser Compatible

Cross-browser Compatible

Our themes are W3C standards compliant which means regardless of the browser - Chrome, Firefox, Safari or Internet Explorer - your site renders perfectly.
Custom Page Templates

Custom Page Templates

Our themes come packaged with multiple pages templates including Archives, Full Width, and additional custom templates to enhance your site.

Localization Ready

All our themes are localized which you can translate into any language using .po and .mo file. Need a tool? Check POEdit.

DOWNLOAD AND DEMO:-

Page invite all in one click to friends in facebook


Invite all friends to facebook page in one click

Invite all your Facebook friends to like page in one click. So guys facebook pages are very important for bloggers, group admins so i am back with a wonderful method for facebook how to Invite all friends to like fanpage withone click. this trick is based on scriptwhich can be use easily in mozilla firefox or google chrome. without likes facebook page is nothing while people can use autoliker for get likes but it’s not safe method so with this method you can invite all friends to invite a fb page without any problems. so let’s talk about invite to like facebook page trick

Features Of Invite all friends to Facebook page in one click

  • No Id Ban
  • Code to invite all friend
  • Fastest Method
  • Based on Script
  • Safe Method

Steps for Invite all friends to Facebook page in one click

  • At First Open Your facebook page in which you want likes
  • Now click On Look Like Screenshot Below
  • After That Copy This Invite friends to facebook page javascript Code In Your Clipboard


var inputs = document.getElementsByClassName(‘uiButton _1sm’); for(var i=0; i<inputs.length;i++) { inputs[i].click(); }


CRTL+SHIFT+K
Then paste above code there and press enter
  • Now If you are using Google Chrome Then Press
CRTL+SHIFT+J
Then paste above code there and press enter
  • Now you almost done… just wait for 2-3 Minutes it will auto invite your all friends to Like Facebook Page

How to Take Screenshots in Windows 10

A screenshot is an image taken by a user to record the visible items displayed on the monitor, mobile device, or other visual output device in use. Today we’re going to show you how to take a screenshot in Windows.
All the major platforms have some level of support for taking screenshots. There are many tools out there for taking screenshots in Windows. If your needs are pretty basic then you don’t have to install a third party application. In this article I’ll show you different ways on how to take a screenshot in Windows 10.

 — Print Screen (PrtScn)

You can use the print screen method to take a screenshot and automatically save it as a file, take a screenshot without saving it as a file, or take a screenshot of only one window (instead of the whole screen). The print screen button may be labeled as “PrtScn,” “PrntScrn,” “Print Scr,” or something similar. On most keyboards, the button is usually found between F12 and Scroll lock. On laptop keyboards, you may have to press the “Function” key to access “Print Screen.” You will not receive any confirmation that the screenshot has been taken.

To Take a Screenshot and Save It as a File

Press the “Windows logo key + PrtScn.” If you’re using a tablet, press the “Windows logo button + volume down button.” The screen will dim for a moment when the screen is copied and saved as a file in the Screenshots folder (in /Users/User Name/Pictures). If the Screenshot folder does not exist, Windows will automatically create it. The screenshot is automatically labeled with the file name as “Screenshot (Number).png” with number indicating the screenshot index counter. Each screenshot you take increases the counter by one.
You will only see your screen dim if you have the “Animate windows when minimizing and maximizing” turned on in your visual effects settings (System > Advanced system settings > Click the Advanced tab > Click Settings under Performance section). Note — On some laptops and other devices, you may need to press the “Windows logo key + Ctrl + PrtScn” or “Windows logo key + Fn + PrtScn” keys instead. Check the manual that came with your laptop or device for more information.

To Take a Screenshot of Display Without Saving

Press the “PrtScn” key. A screenshot of your display is now copied to the clipboard, paste it wherever you like. The dimensions of the image will be the same as your desktop resolution. Note — On some laptops and other devices, you may need to press the “Ctrl + PrtScn” or “Fn + PrtScn” keys instead. Check the manual that came with your laptop or device for more information.

To Take a Screenshot of Only One Window

Click on the title bar off the window that you want to take a screenshot of to make it the active window on your screen. Press the “Alt + PrtScn” key. A screenshot of your currently active window is copied to the clipboard, paste it wherever you like. Note — On some laptops and other devices, you may need to press the “Alt + Fn + PrtScn” keys instead. Check the manual that came with your laptop or device for more information.

HTTPS: Blogger Images Given Relative Paths

blogger images served with relative urlsI guess blogger heard us finally! =) We reported back some 5 major disadvantages of switching to HTTPS for blogspot blogs and among these disadvantages was the serious concern of mixed content issue majorly caused by picasa images inserted inside the blog posts. These images was given absolute paths and we discussed that unless images are given relative paths, switching to https at this stage could be a nightmare. Fortunately just recently all blogspot blogs which uses the encrypted and secure HTTPS connection will get all its media content auto replaced with Relative URLs. All images are auto served with relative paths

Note: Click the Button below to see full list of topics under discussion.

Topics List

How are Images Stored in Relative URLS?

All images that you upload in a blogger blog are stored inside Picasa web album. Previously even if you had enabled HTTPS, your visitors would continue seeing the following http error in their address bar. It was caused mainly due to image links stored in http:// instead of https://

https error in blogspot blog

Connection is Not Secure

The connection to this website is not fully secure because it contains unencrypted elements (such as images) or the encryption is not strong enough.

But now this issue has been fixed thanks to relative paths which automatically replaces your Image HTTP URLS with HTTPS URLS. 

relative path and absolute path for images

In Relative URLS case you don't need to change the URLs from http to https because the image src will pick the current Domain URL structure of your site no matter how many times you change it.

BEFORE:

Before switching to https, blogger images are stored in absolute paths which looks like the one below:

http://3.bp.blogspot.com/-uH6EWDyC8uc/URKlnspDBRI/AAAAAAAAJGw/z_6DsQvaH9g/image%25255B7%25255D.png?imgmax=800


AFTER:

After switching your .blogspot.com domain to HTTPS, the images will get a relative path or naked paths without the hyper text protocol as shown below:

//3.bp.blogspot.com/-uH6EWDyC8uc/URKlnspDBRI/AAAAAAAAJGw/z_6DsQvaH9g/image%25255B7%25255D.png?imgmax=800

Thanks to this relative URLS your connection will remain secure and your visitors wont see "connection Is Not Secure" Instead they will now see a "Secure connection" alert box in the address bar as shown below:

secure connection in blogger blogs

Secure Connection

Firefox has blocked parts of this page that are not secure

Areas which are blocked are your widget scripts which are using the HTTP connection. You will need to manually replace it with HTTPS or upload your scripts at a secure https hosting.

Your views?

Just two months ago we raised this SEO blunder that was causing serious trouble but I am really glad now that blogger has fixed this mixed content issue and has handled it effectively at server side. This was exactly was we recommended in our post. Do read that post to get a clear idea of what we mean. Although I will still request that blogger team may now also fix the http to https redirection problem which is not yet sorted out. Only then switching to HTTPS could effect a blog's search ranking positively.

How do you think this latest development will help publishers better fix the mixed content errors? What else would you request from blogger to fix? Do share your views in the comment box below.

Finally for bloggers with over 1K-10K posts, relative paths are surely no less than a heaven! =) 

Thursday, 24 December 2015

Yoast - Google Analytics by Yoast Premium v1.2.1


“Custom dimensions”? What’s that?

Custom dimensions allow you to track extra parameters with each pageview. For instance, you can track the author of each post or page that receives a pageview and based on that see how many pageviews specific authors get. Or you can track the category or post type and see page views split out by those. Or you can track all of those. We’ve got five custom dimensions you can track right now:
  • AuthorTracks pageviews per author, so you can compare authors or even pay authors based on the number of pageviews their articles received.
  • Category
    Tracks the posts category, this allows you to easily see which categories are doing best on your blog and you might want to publish more in.
  • Post Type
    Tracks whether the page viewed is a post, page or any custom post type. We use it for instance to have custom reports for our plugins pages (which are a separate post type).
  • Logged In
    Tracks whether the viewer is logged in or not, this is especially useful on BBPress / BuddyPress type sites where you have a lot of logged in users.
  • Published at
    This tracks the publication time of the post or page, allowing you to compare not just months, but for instance check in december whether the posts you wrote in january or those you wrote in february did better in december.

DOWNLOAD LI NKS :-

  1. http://www.upl.me/15CHGw
  2. http://www.solidfiles.com/d/f7587fecd4/yoastganalytics121.rar
  3. https://userscloud.com/id9swb0nmral
  4. http://uptobox.com/4thl8u9zi8eb
  5. http://www.hotfiles.ro/download/yoastganalytics121.rar/1304296
  6. http://www.mirrorcreator.com/files/1R1KXRNB/yoastganalytics121.rar_links
  7. http://www26.zippyshare.com/v/EpuOP1uV/file.html
  8. http://www.nowdownload.ch/dl/d4e93b66c25c0
  9. http://ul.to/9p57wh0z
  10. http://rg.to/file/0fd4125a0ecb6478545d778038ee33fe/yoastganalytics121.rar.html
  11. http://www.mediafire.com/download/a6293195r7sk1dl/yoastganalytics121.rar

Yoast Local SEO plugin v1.3.2


Higher ranking in local search

Searching in Google (or any other search engine) for a hairdresser or a dentist will result in a list of hairdressers or dentists in your local community. So, local search appears to happen spontaneously! However, in order to give a (high) ranking, Google does need to know the exact location of your business. Above that, Google needs to know what type of business you provide.
Our Local SEO plugin provides Google and other search engines with the exact information it needs to show your company website in the local search results. Whether your company has only one office, or multiple locations, our Local SEO plugin will make sure it will appear in the local search results.

DOWNLOAD LINKS:-

  1. http://www.myuplbox.com/file/download/1224426
  2. http://www.mirrorcreator.com/files/G76NHWKH/yoastlocalseo132.rar_links
  3. http://hotupload.ro/yoastlocalseo132-rar/fdc5ec8b.html
  4. http://www16.zippyshare.com/v/72848542/file.html
  5. http://www.nowdownload.ch/dl/2fa1fd12fab97
  6. http://ul.to/tity8zo7
  7. http://rg.to/file/eb968a3e9a1ea83ada8d16d8c9bb6093/yoastlocalseo132.rar.html
  8. http://www.upl.me/RdUfHk
  9. http://www.solidfiles.com/d/5360420c39/yoastlocalseo132.rar
  10. http://www.mediafire.com/download/hjvdpv03noi3e19/yoastlocalseo132.rar